I was snowshoeing alone one evening in the Big Eau Pleine Park near Wausau, Wisconsin. This scenic 1,450 acre county park is located on a peninsula that jets out into the Big Eau Pleine Flowage. I began at the trailhead and hiked along the edge of the ski trail. It was in the late afternoon. At a point on the trail, I referenced my compass and decided to go off-trail and head west, since there was not much daylight remaining to finish hiking the entire circle.
After breaking trail for what seemed quite a ways, I became concerned with the onset of dark. I was not so much worried about snowshoeing at night since I do that quite a bit anyway. But I was more concerned that my wife would be worried. I knew that if I kept heading west, I eventually would cross the park road that runs down the center of the peninsula. Most likely I would end up south of the trailhead and then hike up the road to my car.
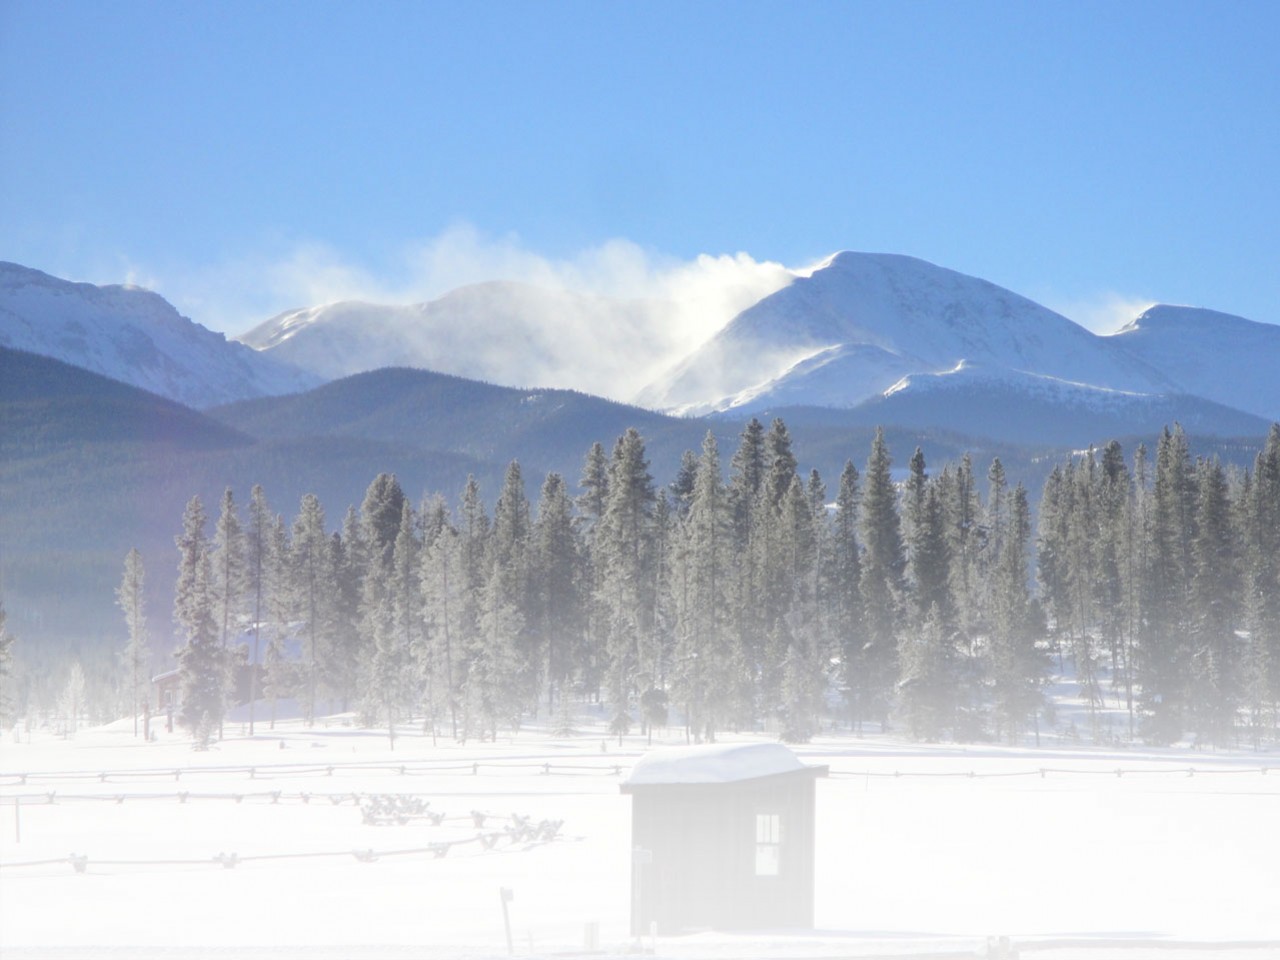
I saw a ridge in the distance. I thought surely something has to be over that ridge. As I began to crest the hill, I saw the top of an outhouse. Great! I must be south of the trailhead on the park road somewhere, but how far south I was not sure. Taking a dozen more steps, I saw the roof of my car. How I ever came out exactly where I put in, I do not know. Either I was more competent with my compass skills than I thought or maybe it was divine intervention. When I got home it was dark and my wife didn’t even notice I was gone.
Learning to use a map and compass is an essential skill to snowshoeing, especially if you plan to snowshoe in the backcountry. There are three important principles to know when it comes to snowshoe travel in the backcountry. 1) Bring a map and compass with you; 2) Know how to use the map and compass; 3) Use the map and compass.
Now that’s pretty simple. But the more complicated component is learning to use a map and compass effectively. I periodically hear of hunters in the Midwest who take a compass with them into the woods while searching for game. The problem some experience is that once in the woods and lost, they then pull out their compass to aid them in their return back to camp or car. To their surprise, the only thing the compass does mechanically is point to magnetic north. If they didn’t take a bearing going into the woods, it won’t help them to know which direction to come out of the woods.
In every college snowshoeing course I teach, I include a unit on map and compass. I not only cover basic information, but I put the skills to work by having students complete an outdoor orienteering exercise. Although the use of Global Positioning Systems (GPS) have become a popular means of travel (I have one myself), I still find it essential that students learn how to use a map and compass first and foremost.
Here are some map and compass basics to know prior to heading into the backcountry on snowshoes. These are the very basics, so you will need to explore the topic further to develop skills and competencies.
The compass rose

The compass “rose” is graduated in degrees with 360 degrees making up the full circle. North, south, east and west are called the “cardinal” directions and are 90 degrees apart. The “inter-cardinal” directions include northeast, southeast, southwest and northwest. There are 45 degrees between each cardinal to inter-cardinal direction. Thus there are eight principal points on the compass.
A note about magnetic declination in the United States
Your compass will always point to “magnetic north.” That’s its job. Most maps are printed with “true north” or the direction toward the geographic North Pole. The angular difference between magnetic north and true north is called “declination.”
The “agonic line” or zero declination runs up through central Wisconsin. So the declination is near or at zero degrees, making compass use where I teach quite easy as I am near zero declination. If you are east or west of the agonic line, you need to compensate for the difference to get accurate directions when going from map to field or vice verse. The farther from the agonic line, the greater the declination; and you will need to add or subtract a set of degrees in order to get a true bearing. Check maps for the declination in the given area. Note that declination may also vary slightly year-to-year as the magnetic pole is constantly moving; so try to use maps that are recently dated.

Compass operation
As I mentioned, the compass always points to magnetic north. The red magnetic needle on the compass is the component that points to magnetic north. Your orienteering compass has a compass housing (with a degree dial) that manually turns, allowing the degree markings from “0” to “360” to rotate. There is an orienting arrow on the compass housing that is outlined in red and rotates when you turn the housing. The object is to turn the housing until the red magnetic needle sits within the red orienting arrow. This is referred to as putting the “red in the shed.” Thus, this is how you set your compass to magnetic north.
Taking a compass bearing
On the base plate of an orienteering compass, there is a direction of travel arrow at the front end of the plate. The line that comes off the compass housing is the index line. The index line and the direction of travel arrow are basically the same line if connected.
Holding the compass in hand about mid-chest level and parallel to the ground, point the direction f travel arrow toward a landmark, such as a tree or boulder that is in your direction of travel. Then turn the compass housing until the red magnetic needle is in the red orienting arrow. Put the red in the shed. The degree number that lines up with your direction of travel index line is the “bearing” for your direction of travel. This is how you take a bearing to some landmark that you have identified as your direction of travel. For example, if your direction of travel is northeast, your bearing would read 45 degrees.

Taking a bearing from your destination back to your starting point:
When you arrive at your destination or a landmark, you may want to know the direction back to where you started; a tip for my hunting friends. This would be the opposite direction on your compass rose. To get the return direction from your destination back to your starting point, add 180 degrees to your original direction of travel for any degree under 180 (such as: travel to landmark is 40 degrees; travel back would be 40 + 180 = 220 degrees). Subtract 180 degrees to your original direction of travel for any degree over 180 degrees (such as: travel to landmark is 250 degrees; travel back would be 250-180 = 70 degrees).
Taking a bearing from a map
To take a bearing from a map, lay the edge of your compass base plate on the map running from your point of location to your point of destination. Note that the edge of your compass base plate runs parallel to the direction of travel arrow on your compass and can be used to set your point of direction.
Holding your base plate in place, rotate the compass housing until your compass orienting lines and orienteering arrow are parallel to the vertical map grid lines (the lines running up and down the map). Disregard the actual direction of the magnetic needle at this point, as you are not trying to find magnetic north while taking a bearing from a map. Now, read the bearing (in degrees) from the degree dial at the index line. This is the bearing for your direction of travel.
********
Staying found is the goal. The above is just the tip of the iceberg when it comes to using a map and compass for backcountry snowshoe travel. But I do encourage that you further your knowledge and enhance your skills by referencing some good resources such as Wilderness Navigation by Bob Burns and Mike Burns, Staying Found by June Fleming, or an old standard of mine, The Basic Essentials of Map and Compass by Cliff Jacobson. Also, consider take an orienteering course. Experience is the best teacher. Enjoy snowshoeing in the backcountry or on park trails by playing it safe with a map and compass; and happy trails to you.
Follow us for the latest news!